Posts
All Posts
- Zero Export Pv System
Introduction
A zero export PV system is a solar photovoltaic (PV) system designed to ensure that any electricity generated by the solar panels is consumed on-site and not fed back into the utility grid. Essentially, it prevents the export of excess solar energy to the grid.
- On-site Consumption: The primary goal is to maximize the use of solar energy for the homeowner’s or building’s own electricity needs.
- No Export to the Grid: Zero export systems are engineered to avoid sending any surplus solar power into the public power grid.
- Grid Stability and Regulations: This approach is often implemented when local grid operators restrict or prohibit the export of solar energy due to concerns about grid stability or to comply with specific regulations.
- Dynamic Power Regulation: Zero export systems dynamically adjust the solar inverter’s power output to match the building’s electricity consumption in real-time, ensuring no excess power is generated.
- Alternatives to Export: Instead of exporting excess energy, zero export systems may utilize battery storage to store the surplus for later use, or simply reduce solar production to match on-site consumption.
My PV System
I started with a 600 Watt Microinverter and two 380 Watt Solarpananels, I then built a receiver with a ESP32 microcontroller and a 2.4Ghz transceiver to receive status information from the microinverter which sends out serial data over 2.4Ghz when triggered. more info here
- CopyQ on CapsLock
Remapping CapsLock to run Kmonad Script
Let’s say we want to deactivate the physical CapsLock Button, causing it to no longer send the keycode 66. In Gnome we can do that using the Gnome Tweak Tool for example. Because I want to toggle my Clipboard Manager Window by hitting the CapsLock Button to open up CopyQ I was looking for a solution I could use with Wayland. Thankfully I found Kmonad After some fiddeling around I managed to understand how to set it up, you can do a lot more compared to my simple task of binding a shell script to a Button on my Keyboard. So here are my config files:
- Terraform
Tutorial - hcloud-terraform - source
How-to: Install Fedora CoreOS at Hetzner Cloud - source
Oh My ZSH encourages users (in the final section of .zshrc file) to put personal configurations like alias and themes into the directory set as the $ZSH_CUSTOM.
I think it is a good idea to keep all your configurations in this directory, including your path customization. That way you can easily include it to your backups, and restore when necessary.
- Hyprland
Pypr - monitors
# pyprland.toml - draft
[pyprland]
plugins = ["expose","monitors"]

[monitors]
[monitors.placement]
"Dell Inc. DELL P2719H BDFS123".leftOf = "Dell Inc. DELL U2720Q 5TCZZ13"
"LG Electronics LG TV 0x01010101".rightOf = ["Dell Inc. DELL P2719H BDFS123",
"Dell Inc. DELL U2720Q 5TCZZ13"]
Waybar - config.jsonc
[{ "layer": "top", "position": "top", "output": ["DP-3"], "width": 1080, "include": [ "~/.config/waybar/default-modules.jsonc", ], "modules-left": [ "hyprland/workspaces" ], "modules-center": [ "hyprland/window" ], "modules-right": [ "clock" ] }, { "layer": "top", "position": "top", "output": ["DP-5"], "width": 2560, "include": [ "~/.config/waybar/default-modules.jsonc", ], "modules-left": [ "hyprland/workspaces" ], "modules-center": [ "hyprland/window" ], "modules-right": [ "custom/weather", "cpu", "memory", "network", "temperature", "pulseaudio", "idle_inhibitor", "tray", "clock", "custom/wlogout" ], "network": { // "interface": "wlp2*", // (Optional) To force the use of this interface "format-wifi": "{essid} ({signalStrength}%) ", "format-ethernet": "{ipaddr}/{cidr} ", "tooltip-format": "{ifname} via {gwaddr} ", "format-linked": "{ifname} (No IP) ", "format-disconnected": "Disconnected ⚠", "format-alt": "{ifname}: {ipaddr}/{cidr}" }, "cpu": { "format": " {usage: >3}%", "on-click": "alacritty -t waybar_btop -e btop" }, "memory": { "format": "{}% " }, "temperature": { // "thermal-zone": 2, "hwmon-path": ["/sys/class/hwmon/hwmon2/temp1_input"], "critical-threshold": 80, "format-critical": "{temperatureC}°C {icon}", "format": "{temperatureC}°C {icon}", "format-icons": ["", "", ""] }, "pulseaudio": { // "scroll-step": 1, // %, can be a float "format": "{volume}% {icon} {format_source}", "format-bluetooth": "{volume}% {icon} {format_source}", "format-bluetooth-muted": " {icon} {format_source}", "format-muted": " {format_source}", "format-source": "{volume}% ", "format-source-muted": "", "format-icons": { "headphone": "", "hands-free": "", "headset": "", "phone": "", "portable": "", "car": "", "default": ["", "", ""] }, "on-click": "pavucontrol" }, "idle_inhibitor": { "format": "{icon}", "format-icons": { "activated": "", "deactivated": "" } }, "tray": { // "icon-size": 21, "spacing": 10 }, "custom/weather": { "exec": ".config/waybar/scripts/weather.sh City+Country", "return-type": "json", "format": "{}", "tooltip": true, "interval": 3600 }, "custom/wlogout": { "format": "", "interval": "once", "on-click": "wlogout -c 5 -r 5 -p layer-shell", } }, ]Wayabar - default-modules
{ // ROMAN Numerals style "hyprland/workspaces#roman": { "active-only":false, "all-outputs": true, "format": "{icon}", "show-special": false, "on-click": "activate", "on-scroll-up": "hyprctl dispatch workspace e+1", "on-scroll-down": "hyprctl dispatch workspace e-1", "persistent-workspaces":{ "1": [], "2": [], "3": [], "4": [], "5": [], }, "format-icons": { "1": "I", "2": "II", "3": "III", "4": "IV", "5": "V", "6": "VI", "7": "VII", "8": "VIII", "9": "IX", "10": "X", }, } } - SQL
Basics
Fundamental Syntax
- SELECT
- FROM
- WHERE
- GROUP BY
- HAVING
- ORDER BY
- LIMIT
Types of Joins - PostgreSQL-Docs
- INNER JOIN
- LEFT JOIN
- RIGHT JOIN
- FULL OUTER JOIN
Joins of all types can be chained together or nested: either or both of T1 and T2 may be joined tables. Parentheses may be used around JOIN clauses to control the join order. In the absence of parentheses, JOIN clauses nest left-to-right.
To put this together, assume we have tables t1
- Kubernetes
Index
- K8s Networking
Kubernetes single-stack IPv6 !?
- K8s Democluster
Planning a cluster
- Minikube on a VPS from scratch
- Minikube + Gitlab - Developing for Kubernetes with minikube
- Kind using private container-registry
- Pull an Image from a Private Registry
- Organizing Cluster Access Using kubeconfig Files
- Configure Access to Multiple Clusters
POC - Runnning a Python App in Kubernetes
- create Dockerfile or use hello-python
- based on Flask Minimal App Example
- Get started with Kubernetes - using Python
- kubectl create secret docker-registry
- Running a Python Application on Kubernetes
- Deploy Python App to Kubernetes
Personal Kubernetes Cloud Sandbox
I would like to have an environment consisting of minimum 3 VMs and mounted Volumes for persistent or backup storage. Because I have tested this model on Hetzner I would like to improve the system over there while I would like to motivate people here that have a favor for AWS, GCI, OCI or AZURE take the approach and build a system like it on their favorite cloud provider.
- K8s Structure
Kubernetes directory Structure - source
/etc/kubernetes/: This folder contains the main configuration files for the Kubernetes control plane components./etc/kubernetes/manifests/: This folder contains the YAML files for the Kubernetes system components that run as pods./etc/kubernetes/pki/: This folder contains the public key infrastructure (PKI) files that are used for secure communication between the different components of the Kubernetes cluster./etc/cni/net.d/: This folder contains the configuration files for Container Networking Interface (CNI) plugins used by Kubernetes to manage networking./var/lib/kubelet/: This folder contains the actual data and volumes associated with each pod, as well as the config.yaml file for the kubelet./opt/cni/bin: This folder contains the binary files for CNI plugins used by Kubernetes.
/etc/kubernetes/
├── manifests/                       # YAML files defining Kubernetes resources
│   ├── etcd.yaml                    # etcd cluster manifest
│   ├── kube-apiserver.yaml          # kube-apiserver manifest
│   ├── kube-controller-manager.yaml # kube-controller-manager manifest
│   ├── kube-scheduler.yaml          # kube-scheduler manifest
│   ├── kube-proxy.yaml              # kube-proxy manifest
│   └── ...
├── pki/                             # Public Key Infrastructure for Kubernetes
│   ├── apiserver.crt                # Kubernetes API Server certificate
│   ├── apiserver.key                # Kubernetes API Server private key
│   ├── ca.crt                       # Cluster Certificate Authority certificate
│   ├── ca.key                       # Cluster Certificate Authority private key
│   └── ...
├── kubelet.conf                     # kubelet configuration file
├── controller-manager.conf          # kube-controller-manager configuration file
├── scheduler.conf                   # kube-scheduler configuration file
└── admin.conf                       # kubeconfig file for cluster administrator

/etc/cni/net.d/                      # Folder containing CNI configuration files

/var/lib/kubelet/
├── pods/                            # Directory containing pod volumes and data
├── pki/                             # Public Key Infrastructure for kubelet
├── config.yaml                      # kubelet manifest
└── ...

/opt/cni/bin/                        # Container Networking Interface (CNI) binaries
12 Factor Application Philosophy - source
- Codebase: Manage all code in version control systems (like Git or Mercurial). The codebase comprehensively dictates what is deployed.
- Dependencies: Dependencies should be managed entirely and explicitly by the codebase, either vendored (stored with the code) or version pinned in a format that a package manager can install from.
- Config: Separate configuration parameters from the application and define them in the deployment environment instead of baking them into the application itself.
- Backing services: Local and remote services are both abstracted as network-accessible resources with connection details set in configuration.
- Build, release, run: The build stage of your application should be completely separate from your application release and operations processes. The build stage creates a deployment artifact from source code, the release stage combines the artifact and configuration, and the run stage executes the release.
- Processes: Applications are implemented as processes that should not rely on storing state locally. State should be offloaded to a backing service as described in the fourth factor.
- Port binding: Applications should natively bind to a port and listen for connections. Routing and request forwarding should be handled externally.
- Concurrency: Applications should rely on scaling through the process model. Running multiple copies of an application concurrently, potentially across multiple servers, allows scaling without adjusting application code.
- Disposability: Processes should be able to start quickly and stop gracefully without serious side effects.
- Dev/prod parity: Your testing, staging, and production environments should match closely and be kept in sync. Differences between environments are opportunities for incompatibilities and untested configurations to appear.
- Logs: Applications should stream logs to standard output so external services can decide how to best handle them.
- Admin processes: One-off administration processes should be run against specific releases and shipped with the main process code.
Key Terminologies - source
- Image It is an immutable file that contains the source code, libraries, dependencies and tools to run an app.
- Container It is a running instance of an image.
- Cluster It is a collection of nodes that runs containerized apps.
- Node It is the smallest unit of computing hardware in Kubernetes.
- Pod They are the smallest deployable units in Kubernetes. Each pod can consist of one or more containers.
- Service It enables network access to a set of pods in Kubernetes.
- Deployment It is used to create or modify instances of pods and provides declarative updates to apps.
- Docker It is a set of tools for building ,sharing container images and running containers.
- K8s Deployment
From Docker to Kubernetes
- How to deploy a docker image to Kubernetes?
- Building Docker images for Kubernetes
Demo Installation on Hetzner Cloud
- Kubernetes on Hetzner with Claudie!
- kubectl on fedora
- kind - Kubernetes in Docker
- What Is Moby and How Does It Relate to Docker?
- Add your user to the docker group
- Create a kind cluster and export the kubeconfig
kind create cluster --name claudie-mgmt - Managing Secrets using kubectl
Screenshots - Hetzner Demo Cluster
- K9s-Cluster-View

- K9s-Nodes-View

- Hetzner-Cluster-Overview

K8s-Management-Cluster
- Components:
Links
- Deploy Python App into Kubernetes
- Running a Python Application on Kubernetes
- Get started with Kubernetes - using Python
- Mesh your Kubernetes cluster to the rest of your network with Tailscale
- Kubetools - A Curated List of Kubernetes Tools
- Beispielanwendung in GKE bereitstellen
- Using kubectl to Create a Deployment
- Creating a cluster with kubeadm
- Build and Deploy Your First Image to Your First Cluster
- Docker and Kubernetes: How They Work Together
- kubectl for Docker Users
- Building Docker images in Kubernetes
- How to Deploy docker image to Kubernetes
- Create and Deploy a Docker Container Image to a Kubernetes Cluster
- Setup your own scalable Kubernetes cluster with the Terraform provider for Hetzner Cloud
- K8s-Studyguide
1. Introduction to Kubernetes:
Kubernetes is a popular open source platform for container orchestration. It enables developers to easily build containerized applications and services, as well as scale, schedule and monitor those containers. What is Kubernetes container orchestration?
2. Architecture:
- Kubernetes Components: Master node, Worker node, etcd, kubelet, kube-proxy, etc.
- K8s Networking
- CI/CD
CI/CD
Definition
source
In software engineering, CI/CD or CICD is the combined practices of continuous integration (CI) and continuous delivery (CD) or, less often, continuous deployment. They are sometimes referred to collectively as continuous development or continuous software development.- Pipelines
What is a CI/CD pipeline? - source
A CI/CD pipeline automates your software delivery process. The pipeline builds code, runs tests (CI), and safely deploys a new version of the application (CD).
Automated pipelines remove manual errors, provide standardized feedback loops to developers, and enable fast product iterations.
Hugo CI/CD Pipeline - source
image: registry.gitlab.com/pages/hugo/hugo_extended:latest

variables:
  HUGO_ENV: production
  THEME_URL: "github.com/alex-shpak/hugo-book"

default:
  before_script:
    - apk add --no-cache go curl bash nodejs
    - hugo mod get -u $THEME_URL

pages:
  script:
  - hugo
  artifacts:
    paths:
    - public
  rules:
  - if: $CI_COMMIT_BRANCH == $CI_DEFAULT_BRANCH
Python Poetry CI/CD Pipeline
# This file is a template, and might need editing before it works on your project.
# To contribute improvements to CI/CD templates, please follow the Development guide at:
# https://docs.gitlab.com/ee/development/cicd/templates.html
# This specific template is located at:
# https://gitlab.com/gitlab-org/gitlab/-/blob/master/lib/gitlab/ci/templates/Python.gitlab-ci.yml

# Official language image. Look for the different tagged releases at:
# https://hub.docker.com/r/library/python/tags/
image: python:latest

# Change pip's cache directory to be inside the project directory since we can
# only cache local items.
variables:
  PIP_CACHE_DIR: "$CI_PROJECT_DIR/.cache/pip"

stages:
  - test
  - lint
  - types
  - deploy

# https://pip.pypa.io/en/stable/topics/caching/
cache:
  paths:
    - .cache/pip

before_script:
  - python --version ; pip --version  # For debugging
  - pip install poetry
  - poetry install
  - source `poetry env info --path`/bin/activate


Unit Tests:
  stage: test
  script:
    - echo "This is the test stage."
    - cd tests
    - poetry --version

Python Code Lint:
  stage: lint
  script:
    - echo "let's do some linting."
    - black .

Static Type check:
  stage: types
  script:
    - echo "let's do some type checking."
    - mypy .

Deploy:
  stage: deploy
  script:
    - echo "let's deploy some code."
GitLab CI Pipeline - source
# Work in Progress Pipeline for GitLab CI

default:
  image: python:3.9

before_script:
  - pip install poetry
  - poetry install
  - source `poetry env info --path`/bin/activate

stages:
  - test
  - build

testing:
  stage: test
  script:
    - echo "This is the test stage"
    - cd tests
    - python3 -m unittest -v
    - pytest --junitxml=report.xml
  artifacts:
    when: always
    reports:
      junit: /builds/USERNAME/python-devop/tests/report.xml

building:
  stage: build
  needs: [testing]
  script:
    - echo "This is the build stage"
    - poetry config repositories.gitlab https://gitlab.example.de/path/to/packages/pypi
    - echo "Repository gitlab configured ..."
    - poetry build
    - echo "Build done ..."
    - poetry publish --repository gitlab -u YOURUSERNAME -p YOURTOKEN
    - echo "Publishing done!"
Advanced Pipeline Examples
- Pipelines
- E Commerce
E-Commerce Knowledgebase
- GA4 Big Query
Google Analytics 4
Introduction to Google Analytics 4
source: https://develop… Google Analytics 4 is an analytics service that lets you to measure traffic and engagement across your websites and apps. This documentation provides implementation instructions and reference materials geared towards a developer audience.
Add the GA4 configuration tag to your website
Prerequisites
- Login to GCP - Google Cloud Platform
- Create New Project - see screenshot
- Click on BigQuery - enable BigQuery
- In Ananlytics add link to BigQuery
Default conversion value options
Link a Google Analytics 4 property to BigQuery
- Performance
Business Performance Measures
source: https://www.skillmaker.edu.au/business-…
Business performance measures are a set of quantifiable metrics taken from various sources that together with an appropriate analytical process, allows the management of a business to track and assess the current status of a specific business, project or process. Business performance measures may be compared with pre-set goals and objectives or form part of a balanced scorecard that assesses financial or non-financial performance in the four primary areas of financial, learning/growth, internal processes and the customer. Business performance measures may also be known as organizational performance, results or key success indicators and are closely related to an organisation’s key performance indicators (KPI).
- GA4 Big Query
- Cloud
Hyperscaler Demos
- Grafana
Grafana is a multi-platform open source analytics and interactive visualization web application. It provides charts, graphs, and alerts for the web when connected to supported data sources.
Prerequisites
- hetzner - vServer - CPX21
- 3 VCPU
- 4 GB RAM
- 80 GB DISK LOKAL
- OS - Fedora 39
- packages
- zsh
- oh-my-zsh
sh -c "$(curl -fsSL https://raw.githubusercontent.com/ohmyzsh/ohmyzsh/master/tools/install.sh)"- tmux
- neovim - LazyVim
- fail2ban
- sendmail
- ufw
- nginx
- letsencrypt - steps to do
- certbot, python3-certbot-nginx
- postgres-server
- grafana
Configuration
- postgres
- Installation and Configuration
- User Creation and Database Creation
- IMPORTANT - Prevent Login Issue
- and edit host all all 127.0.0.1/32 ident to host all all 127.0.0.1/32 md5 <– IMPORTANT This should allow most applications to connect with username/password. pg_hba.conf for reference
- Database user permissions (Important!) - Link to Docs
-> Also works for GRANT SELECT ON TABLE permissionsCREATE USER grafanareader WITH PASSWORD 'password'; GRANT USAGE ON SCHEMA schema TO grafanareader; GRANT SELECT ON schema.table TO grafanareader;
Screenshots
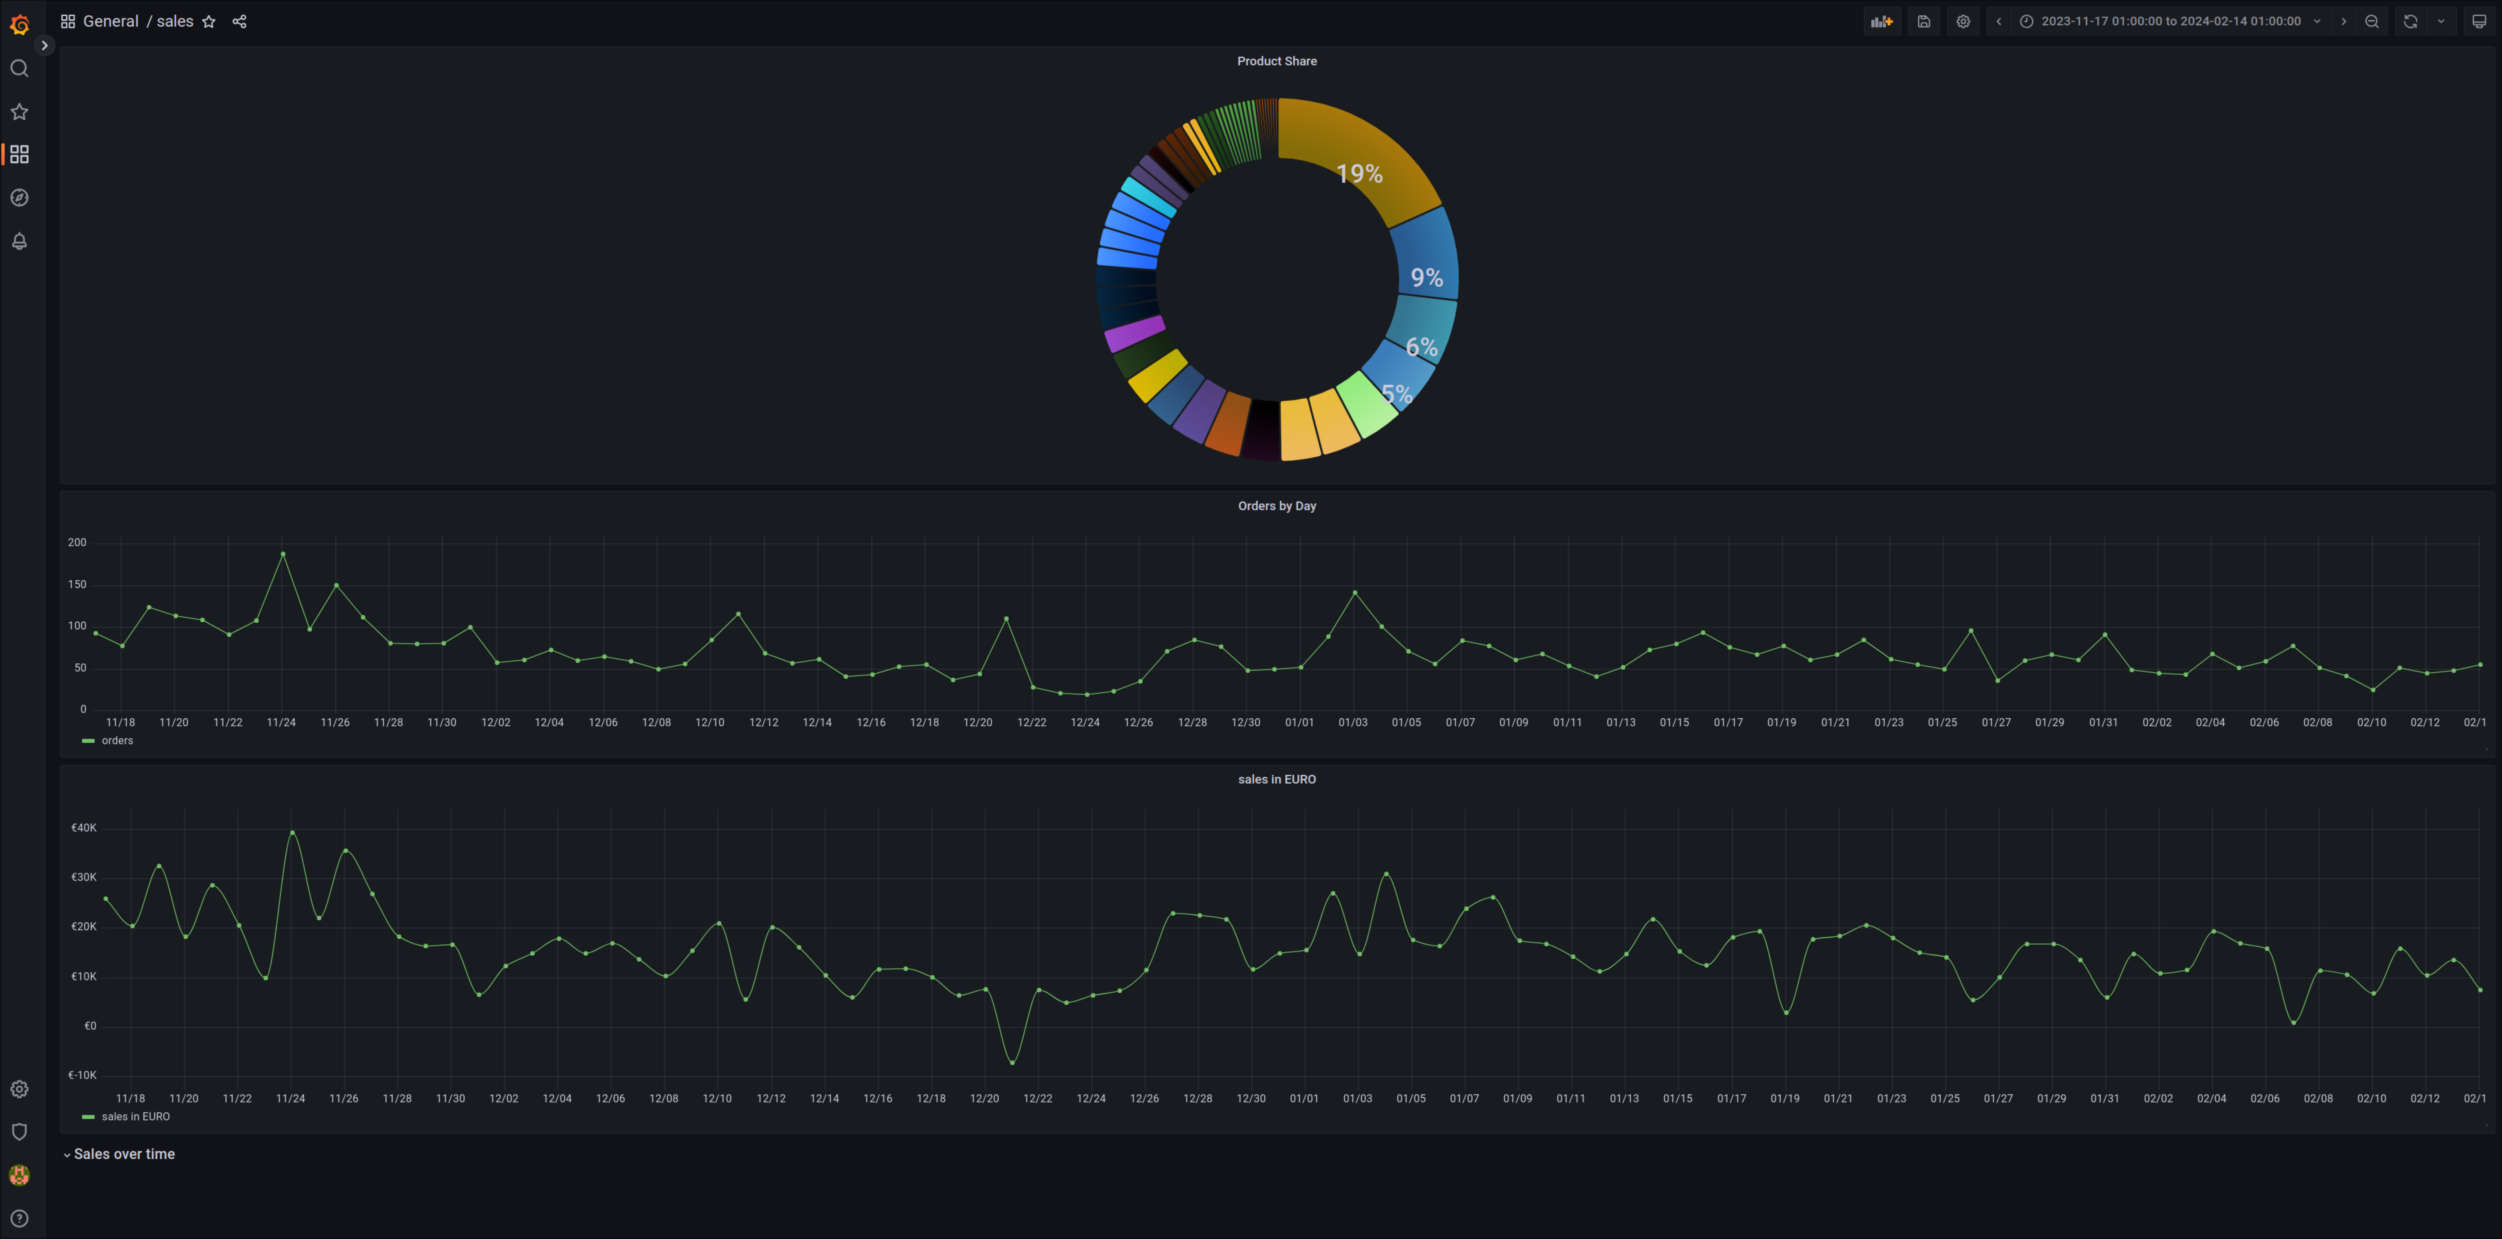
- hetzner - vServer - CPX21
- USB-Flashdrive-Notes
1. Wipe Master Boot Record
Talking about MBR-style partitions…
dd if=/dev/zero of=/dev/[disk device] bs=1 count=64 seek=446 conv=notruncExplanation:
ddThis standard command copies bytes from a source and writes them to a destination.
It’s the simplest flexible tool for this job.if=/dev/zeroHere, we specify that we’re reading from /dev/zero, which is a special device which emits NUL bytes–zeros.
of=/dev/[disk device]Here, we specify which device we’re writing to.
- Homeasisstant
Homeasisstant
- Wifi Mqtt Gateway
Developing a Wifi-Mqtt-Gateway
What does it do?
The gateway receives serial data from micro-inverters over 2.4ghz, generates a message that is published via Wifi to the mosquitto mqtt broker. In Node-Red we subscribe to the topic power/inverter and receive the message generated and sent by the mqtt broker.
Code sample.
The following tutorials can be a source for information.
- Raspberry Pi IoT Server Tutorial: InfluxDB, MQTT, Grafana, Node-RED & Docker
- Simple ESP32 IoT Sensor Node Tutorial: WiFi Enabled MQTT Sensor Data Node
#include <WiFi.h> #include <PubSubClient.h> // Replace the next variables with your SSID/Password combination const char* ssid = "XXXXXXXX"; const char* password = "XXXXXXXX"; // Add your MQTT Broker IP address, example: //const char* mqtt_server = "192.168.1.144"; const char* mqtt_server = "192.168.178.138"; const char* mqtt_username = "XXXXXXX"; const char* mqtt_password = "XXXXXXX"; WiFiClient espClient; PubSubClient client(espClient); long lastMsg = 0; char msg[50]; int value = 0; // LED Pin const int ledPin = 4; void setup() { Serial.begin(115200); setup_wifi(); client.setServer(mqtt_server, 1883); pinMode(ledPin, OUTPUT); } void setup_wifi() { delay(10); // We start by connecting to a WiFi network Serial.println(); Serial.print("Connecting to "); Serial.println(ssid); WiFi.begin(ssid, password); while (WiFi.status() != WL_CONNECTED) { delay(500); Serial.print("."); } Serial.println(""); Serial.println("WiFi connected"); Serial.println("IP address: "); Serial.println(WiFi.localIP()); } void reconnect() { // Loop until we're reconnected while (!client.connected()) { Serial.print("Attempting MQTT connection..."); // Attempt to connect if (client.connect("ESP8266Client",mqtt_username,mqtt_password)) { Serial.println("connected"); // Subscribe client.subscribe("esp32/output"); } else { Serial.print("failed, rc="); Serial.print(client.state()); Serial.println(" try again in 5 seconds"); // Wait 5 seconds before retrying delay(5000); } } } void loop() { if (!client.connected()) { reconnect(); } client.loop(); long now = millis(); if (now - lastMsg > 5000) { lastMsg = now; const char* testString = "Hello MQTT"; Serial.println(testString); client.publish("power/test", testString); } } - Generic X86 64
Install Home Assistant Operating System
How to install Home Assistant on Generic x86-64 Hardware
Let’s follow this tutorial
What do we need?
- Wifi Mqtt Gateway
- Micro Inverter
What it does.
The setup consits of 2 300 Watt solarpanels and a sg600md micro-inverter that can be be plugged directly into a wall socket. The micro-inverter transmits it’s serial console data over 2.4ghz and thanks to the NETSGPClient the output can be received by a lc12s module connected to an ESP32. From there an MQTT client sends the received data to mosquitto over wifi and depending on the topic the MQTT message will be processed by Node-Red. The next step is saving the power statistics in the mqtt message to a database for visual representation in grafana.
- Hugo Setup
Hugo Gitlab Hetzner Setup
How to set up the Hugo static site generator using gitlab pages and a hetzner subdomain.
Prerequisites
See gohugo.io for details.
Getting some context before starting
A helpfull video by Luke Smith, together with his github repo about Hugo helps understand the structure of hugo a little quicker.
Setting up a git repository and pushing it to gitlab
Following the manual on gohugo.io we create our repository like this.


